 Gustav
Generate a 3D character with an AI tool and it usually looks good in the viewport. Put it in a real scene with your own lights and it falls apart. The dark side stays dark, the highlight on the forehead stays where it was, and your new light adds a second set of shadows on top.
The reason is simple: the lighting is part of the colour texture. The fix has a name, delighting, and it is often a manual job in Substance or Photoshop. I wanted it to be one click.
The short version
- InputAny textured mesh with UVs, in Blender
- Modelpix2pix: a U-Net generator judged by a PatchGAN critic, 256 px in and out, exported to ONNX (121 MB)
- Training dataAbout 27,600 pairs of a lit image and its matching flat albedo
- HardwareGeForce GTX 1070, 8 GB, over 115,000 training steps
- Add-on run12 camera views, 1024 px renders, 4096 px output texture
- Test mesh1.9 million triangles, about eight minutes end to end
What the button does
You select the mesh and press one button. Behind it, six things happen:
- Cameras. 12 cameras are spread evenly around the object on a sphere, so the sides and the back are covered too.
- Flat renders. Each view is rendered unlit, showing only the colour texture. That is exactly what the network needs to see: a picture with the baked light in it.
- Delighting. Every view goes through the trained network, which predicts the same picture without shadows and highlights. This takes about ten seconds for all 12 views, on the CPU.
- Projection. For every pixel of the new texture, the add-on works out which cameras can actually see that spot, using a ray cast so hidden surfaces are skipped. Views that look straight at the surface count more than views at a steep angle.
- Gap filling. Spots no camera saw, about 12% on this mesh, are filled from their neighbours.
- New material. The result becomes a new texture and material on the model. The old material assignment is kept, so you can switch back.
Training the network
The network is a classic pix2pix setup: a U-Net that takes a lit image and outputs the albedo, trained against a critic that learns to spot fake albedos. I trained it on pairs of lit images and their ground-truth albedo, split by asset so the test images always show objects the network has never seen.
Getting it to look clean took more experiments than I expected:
- Checkerboard patterns. The standard upsampling layer leaves a faint grid in the output. Replacing it with resize-then-convolve removed it.
- Black blobs. Switching the generator to instance normalisation painted black droplets across the images. Going back to batch normalisation fixed it. Two separate runs showed the same blobs before I trusted the diagnosis.
- A critic that gave up. After tens of thousands of steps the critic's loss dropped to zero, which means it wins every time and teaches the generator nothing. The model was effectively training on pixel error alone. I am rebuilding that part with a more stable critic.
Lesson worth keeping: a training curve that looks calm can mean the interesting part of the model has stopped learning. Look at the images, not only the loss.
The bug that made my first result useless
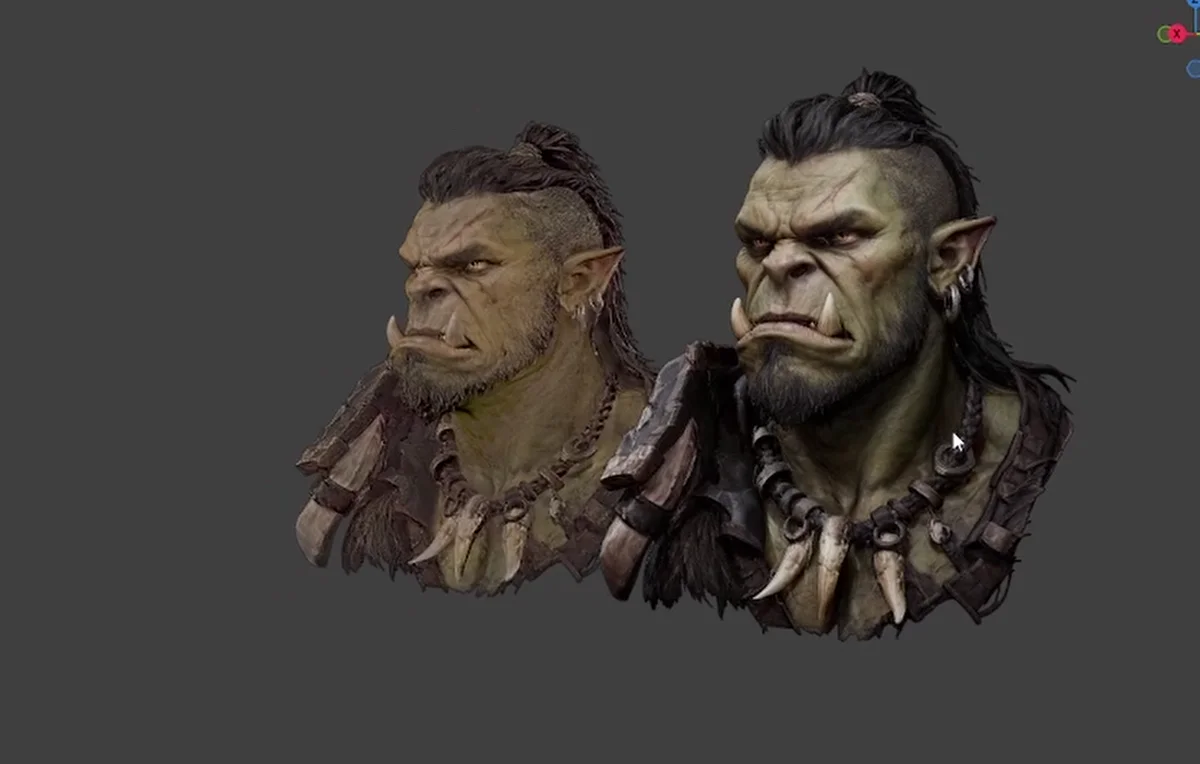
My first run on the orc came out as black and white blotches. I assumed the model was bad. It was not the model.
The orc's material builds its colour through a node group, and my code, looking for the texture behind the base colour, grabbed the first image it found: a black and white projection mask. The network was delighting a mask. After I made the add-on ignore masks, normal maps and data textures, the same model produced the result in the video.
If you build anything that reads materials, expect real-world files to be messier than your test scene. My test was a monkey head with a clean texture. A production character has a dozen images in one material.
What still does not work
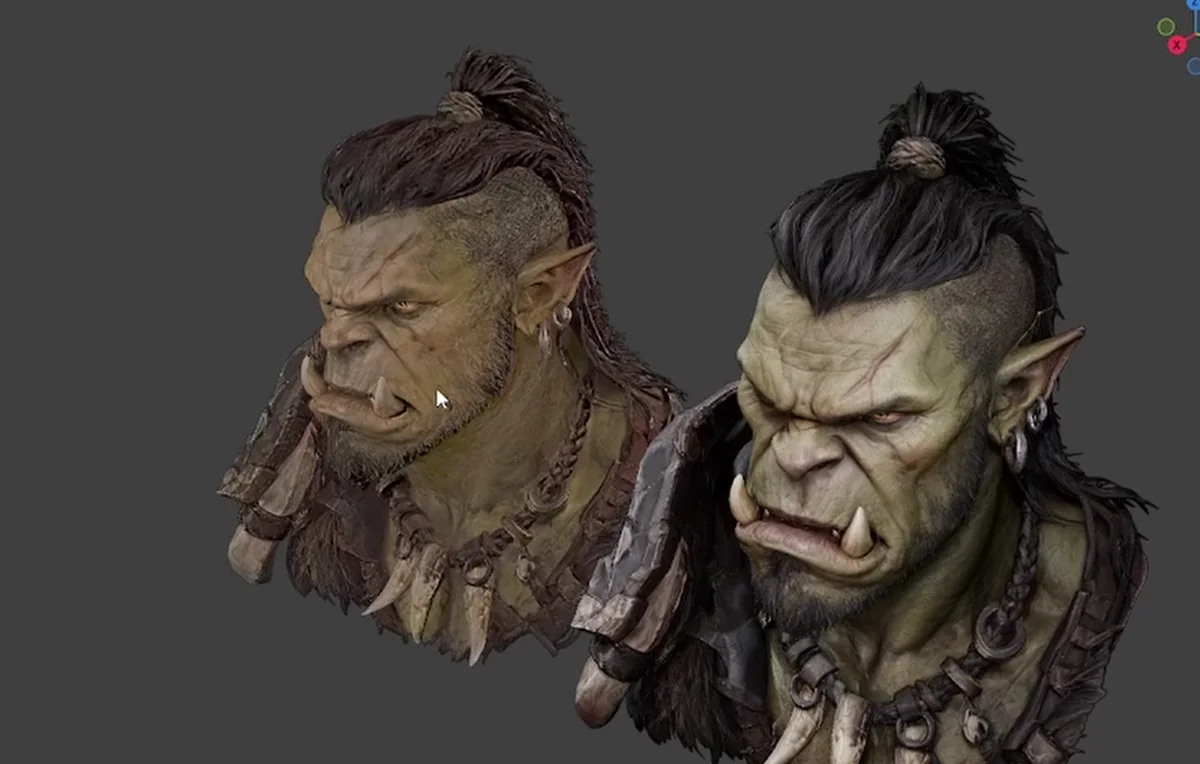
The shadows are gone, the detail survived and the views blend without seams. The colour is the problem. The orc's green skin came out brown, and the black hair turned dark brown. The network sometimes reads a strong colour as coloured light and removes it, which is the right call for a warm lamp and the wrong call for a green orc.
Two fixes are next. The first is a model that gets a partly delighted version of the image as extra input, so it can keep colours that are really there. That one also gives me a blend control: at run time I can choose how much of the original to keep. The second is a 1024 px version of the network, so the delighted views are sharper before they are projected.
Why this matters
AI 3D generators and 3D scans have the same weakness: the texture remembers the light it was captured under. Without delighting, these assets are fine for a quick render and awkward for anything else, such as games, configurators or a scene with your own lighting. A reliable one-click delighter turns them into proper assets.
It also fits how I think about the combination of 3D and neural networks. The 3D model keeps shape and consistency under control, and a trained network handles the part that is painful to do by hand. The same idea runs through the neural rendering experiment where a CycleGAN made a Blender viewport look photoreal.
The add-on is not released yet. If you work with AI-generated or scanned assets and want to test it, or you have a pipeline where a tool like this would save time, get in touch. If you need 3D assets or custom AI tools built for a specific workflow, that is what I do.
Frequently asked questions
What is delighting?
Delighting means removing the lighting from a texture so only the true surface colour (the albedo) is left. A delighted texture has no baked shadows or highlights, so the model can be lit freely in any scene without double shadows.
Why do AI-generated 3D models have lighting in the texture?
Many AI 3D generators, and photogrammetry scans, build their textures from images that were lit. The shadows and highlights in those images end up in the colour map. The model looks fine in a flat viewport, but the baked light fights with any lighting you add.
Does the add-on need a GPU?
No. In my test the network step for 12 views took about ten seconds on the CPU. The slow part is projecting the views back onto a 1.9 million triangle mesh and writing the 4096 texture, which took around seven minutes.
Is the add-on available to download?
Not yet. It is a working prototype that I have tested on one character in Blender 5.0. The colour accuracy needs to improve before I would release it.
Does delighting change the colours of the model?
Right now it can. On the orc in this post the green skin came out warmer and browner, because the network sometimes reads a strong colour as coloured light and removes it. Fixing that is the next step.